Showing posts with label Digital Art Workshop. Show all posts

30.1.08

"Hold On To Your Children and Your Cat"

Rima's Snowday, circa 1969?

That's what the weatherman told me today on the radio - and boy, was that ever good advice! Boreas (wind dude with serious anger issues) has been huffing and puffing and blowing real hard all day. Kind of reminding Ontarians that this is still Canada, eh?

Well, anyway... NO, I have not been abducted by aliens or joined an internet-free commune. I've just had a bunch of hard-pressing issues to deal with, and could not juggle things fast enough to get back to blogging. Apologies all around for not following up quickly on the Glass Apple challenge. That's why I put a picture of me on a snowday somewhere in Lebanon about 40 years ago, 'cause who can stay mad at such a cutie pie, huh? huh?

Special groveling also to some newcomers to our Digital Re-Imaginings* - like the very wonderful bmtyson of Creative Cogitations, a really good graphic artist/collagist who just started blogging. Go take a peek and stay for a visit - he doesn't have a lot of entries yet, so you can catch up on his musings in one sitting. I love his style and look forward to seeing more of his work.

Another cogitative newcomer is an apothecarian of thought, an old friend of our dear Hala** who has sent me a funny and kind-of-sardonic entry. He's also just started blogging, and thinks aloud about the meaning of life, bikini veils and undo buttons. Not in that order, necessarily.

Magic Apple, Digital - © R. Koleilat, 2008

Soooo... what now? Well, all I can do at this point is to promise not to disappear without a word again - and to make up for my rudeness, I will definitely accept any new Apple entries (if you're still interested, Irene!). Not good enough, you say? Well... I would have offered that you pick my punishment, but like the man said - I may be crazy, but I'm not stupid (all evidence to the contrary notwithstanding)!

Oh, did I mention how lovely all the entries were? You guys never cease to amaze... Thanks for putting up with my unevenness. I'll give proper credit and link-backs on the "wall" at Maraya. ASAP.

PS: Thanks, Bobbie and Debi - you were the only ones who got it right!
* I'll come up with a proper title for this series one of these days. In fact, I think I'll put up a poll to see which would be everyone's favourite.
** Another friend of Hala wrote a rant/poem I liked here

9.1.08

Salade d'Apples


One of these was made by me, one by Fawzan and one by Neda. Can you match the names to the artwork?

8.1.08

Apple Turnover

Rotten, Digital - © R. Koleilat, 2007


Bad, bad pun... but hey, it's better than my initial "apple-for-teacher" choice.


Here's my first entry, just so you know I'm working on this too. I'll be showing all the participating entries I am made aware of (hint! leave a comment! Frances!), starting in a couple of days. Four so far, and counting...

How-to: I can't even follow my own directives! I forgot some of the steps because I didn't think I would end up with anything useable - so I didn't make notes, mental or otherwise. For which I was punished by losing a really good one later that day to the memory monster that lives in my laptop - and forgetting the steps there too.
Anyway, here's some of the steps on Photoshop 6:
- I distorted the initial image with Spherize, and by Transforming parts of it (skewing/distorting I think)
- I used a couple of gradient and lighting effects in the background and the central figure (is it still an apple? dunno)
- also used painterly effects, a bunch of them... watercolour as the last touch gave it such a good light, I decided to save it and use it.

7.1.08

Sophomore Class (Digital Makeover)

Glass Apple - Royalty-free image from Stock.XCHNG
This is a bit of a teacher's revenge (curator's revenge?) - I'm offering you a more difficult picture to work with for this Digital Workshop (is it our 4th only?). But you guys have been resting for a while, so it's time to challenge those eyes and brain cells.
No rules, no restrictions - just flex those creative muscles. Anyone can participate, and for those of you who haven't tried this before, here is what you need to know:
  • Click on the picture and copy it to your end (this is a royalty-free image, so you don't have to worry about altering it)
  • Use any digital graphic programme to alter the image - It can be Photoshop (any version), GIMP, PainBox, anything you have. Remember to tell us what it is.
  • It would be nice if you could remember some of the steps, and share with the rest of us how you got to your end result. If you can't keep track, focus on what you feel are the interesting effects.
  • Don't forget to email me a copy of your work - but if you prefer not to or don't know how, point me to your work and I'll copy it off your site if needed. My email address is somewhere on my profile.
  • By participating in this workshop, you are implicitly allowing me to use the image here and on my gallery website, no ifs, ands or buts - and no whining.
  • I reserve the right to choose what ultimately goes on the "wall" (the page on my gallery website). No hurt feelings, ok?
Start your engine! You have until next Sunday to submit.

4.1.08

Trying for Democracy

Quick post/poll thingy: Would you guys prefer:

A. - A regular Photoshop/OtherMagic challenge, where I choose a picture and give guidelines for digital manipulation (as usual and more or less)

or

B. - A combination of Photoshop/Whatever and real-world art supplies?

Please let me know in the comments section by Sunday aft (N.Am. time), so I can set something interesting or fun or tedious up.

3.9.07

Joining In the Fun


La Baigneuse - © Jin, 2007


Untitled - © J.Logan, 2007


I haven't updated my links yet, but two of the amazing women I've met through this fired-up artsy-fartsy blogosphere sent me their contributions to the Old Door and Bathing Beauty Workshops. Go check their sites in the meantime, you'll be bowled over like me (Julie hasn't sent anything but I don't want to wait until I update the right-hand column here).

Julie's Land of Lost Luggage - Yes, she's as witty as her blog title
Joy's This Joy of Arts - Brilliant collages and musings
Jin's À propos du sable - An exquisite visual artist, friend of Alfonso Brezmes (need I say more)

J'ai encore beaucoup de détails à finasser dans ce blog, y compris le gros boulot d'ajouter les textes en français et surtout pour rafraìchir mes links. Et trouver mon dictionnaire, héhé...

En attendant, je présente les contributions de deux nouvelles amies dans cette fofolle et fabuleuse communauté d'artistes-en-ligne que nous avons créé ici. L'exquise Jin a créé cette superbe baigneuse pour l' atelier digital de Bathing Beauty, et Joy cette porte ludique pour l'atelier Old Pisa Door. Julie n'a rien envoy&e;, mais elle est craquante dans son blog et son art.

1.9.07

Hanging Art


Thanks, everyone for patiently waiting to see our Great Wall of Bathing Beauties - there's some really cool work that's been done. What imagination, people - you amaze me!

Here's my bleary-eyed contribution:

Cameo, Digital - ©R. Koleilat, 2007


Comic Book, Digital - ©R. Koleilat, 2007

27.8.07

On Sabbatical

"watch me leave", digital - ©R. Koleilat, 2007

Sweet Irene gave me the idea to go on sabbatical - an elegant way to announce that I probably won't be posting much in the coming few days.

Hey, don't turn that dial yet, I'm not done.

I won't be writing a lot of ingenious, fabulous and seriously cool stuff as usual, but I will, however, keep updating the Bathing Beauty workshop wall. Eh...Maybe write a couple of things here and there too.

You see, I really do need to stop futzing around, and get down to business. My business that is - I have been much too slow in bring the needed changes to my gallery site, because I've been on, well, futzing around speed and have shirked my responsibilities as an art-patron-entrepreneur-something or other.

Voilà, c'est tout - don't worry, I'm not disappearing entirely; I'm not cruel enough to deprive you of my incomparable company for more than a few days. I'll be lurking in the shadows and checking up on YOU!

26.8.07

Summer Kiss-Off - Digital Art Workshop 3


" Bathing Beauty" - from www.wetcanvas.com image library


Despite my best efforts to stall, summer is almost over. I didn't do 1/3 of what I promised myself I'd get done. Wonder if I can cram 2 months worth of work in 5 days?

So here is a befitting kiss-off to the hazy-lazy and decidedly crazy days of summer: a bathing beauty waiting to be reinterpreted in our Digital Art Workshop series.

Since I'm in ultra-slacker mode, I won't rewrite the supposed rules for your participation. However, in case you'd like a good laugh while completely disregarding them, you can still find them here.

To see the previous workshop results, click here and here.

Good sailing everyone!
(and while you're at it, check out hubby's poetry challenge - there's a prize!)

21.8.07

All You Have To Do Is Try

Not one to follow any rules, not even my own, I've decided to display all of Irene's contributions to the Door project, not just the 3 I limited everyone else at. No fair, I hear everyone crying, how come she gets more?

Settle down, kids - First of all, I really couldn't bring myself to pick and choose from her work. Second, you have no idea how happy I was when someone who says she's a total digital art novice decided to join and came up with ALL OF THIS! Kind of like how I felt with Bobbie and Frances and the lilypad.

I have to be true to my heart: Irene is hereby getting unfairly rewarded for a) being fearless, ; and b) showing us some kind of incredible imagination for a supposedly non-artist.

So here it is, the completed wall with everyone's weird and wonderful creations. I haven't finished reorganizing the website, so you can't click around in there to find our workshops yet - link directly to that page here. Enjoy!

18.8.07

Someone's Lurking...

Untitled - © W. Beydoun, 2007

This is Wissam's contribution to the Door project, and here are his steps:

  1. Step one: clean the picture of the bicycles by cloning, smudging
    and copy, paste.
  2. Step two: insert a drawing. Work on it a bit
  3. Step three: lightning effects for a dramatic look.
  4. Lens correction to give the picture a different perspective

I hope I followed the rules... (I am not good at this)"

Hmm, I beg to differ..

14.8.07

Venetian Charm, O'Kieffian Wit

Leaning Toward Venice - © S. O'Kieffe, 2007

With her usual mastery, this is Sue's vision of the Door (remember, the original image is titled Pisa Door) - AND she sent steps along. Marvelous woman. Now read and learn. She even calls features by their correct names.

PART 1

  1. Duplicated image.

  2. Created a selection using rectangular marquee of right side of building.

  3. Copied and pasted it into new layer.

  4. Merged visible layers (Ctrl+shift+e)

  5. Moved selection to left side of new layer.

  6. Edit>Transform>Flip Horizontal to create symmetrical image.

  7. Set colors to default. Filters>Sketch>Photocopy.

  8. Set blending mode to multiply.

  9. Set blending mode of building to Hard Light. (This feature is possible in CS3)

  10. Created adjustment layer.

  11. At bottom of layer palette chose photo filter/cooling filter.

  12. I wanted to put image on a slant. Transformed image (Ctrl/Cmd+T). Edit>Transform>Skew

PART 2

  1. Chose photo of ocean water and adjusted size of image to correspond with image size of building

  2. Created symmetrical image of ocean as described above in step one

  3. Dragged image of ocean onto image of building

  4. Transformed image as described above to follow slant of building.

  5. Set blending mode to Lighten.

  6. I wanted it to look like water was running out from under the door and down the street, so I created a mask and set color to default.

  7. Using black I painted out all parts of the ocean I didn’t want visible. The nice thing about masking is you can undo anything you want by painting in white. BLACK CONCEALS AND WHITE REVEALS

PART 3

  1. Created reflection of building in water following steps in Part 1, step 1, except created a horizontal selection and flipped the image vertically

  2. Created a clipping mask over layer with water. Clipping masks only affect one specific layer at a time and are created in the layer palette by holding down the alt/option key while selecting the desired adjustment.

  3. I chose hue/saturation adjustment, and adjusted colors to hopefully reflect a more Mediterranean color.

  4. I still wasn’t happy with the results of how the water looked. First I chose a color in the color palette that was a turquoise green color and chose it for the foreground color.

  5. Then I went to Filters>Sketch>Photocopy, applied the filter and set blending mode to multiply. This is a handy technique I use in many of my mandalas, too, when I want to create a bit more depth in my images without it looking too much like an illustration.

PART 4

  1. Final adjustment. Created hue/saturation adjustment layer at top of layer stack. Set hue at -12/Saturation at +57

Sue has also very generously attached a copy of her layer colour palette and wrote this about it: "Things will look a bit different because of the specific features in CS3 I used that eliminates the use of multiple layers. It’s a great and long overdue feature, and as far as I can tell so far the best thing about the newest version of Photoshop."

Marvelous, marvelous woman.

(Check here for the "Wall", including Diane's modern/urban-dream take, and freshman Irene's very first attempt at digital imaging)

12.8.07

Doors of Opportunity

Pisa Door Prison D'or - © N.Doany
Thanks for this one, sister mine - especially since I know how tough it is for you to find the time to play.
"When God closes a door, somewhere He opens a window" - Maria von Trapp

Cat From Outer Space?

I seem to remember a movie like that from eons ago.

Anyhoo, here's Fawzan's first take on the Door (I don't know what to make of the writing on the window, but I know where he got the idea of the green light from...)

What are they doing to you? - F. Barrage

I'm starting to hang things on here. (For the previous workshop, check here.)

10.8.07

Frustration Update

No luck on the web editor front, still not able to upload anything. Plus my second printer is kaput.

I really wanted to provide a link to the completed Lily wall, and a good start on the Door one, but short of smashing my computer (a colleague used to call it a confuser) against the wall, I'm stumped. It's obviously going to take still longer to see a refurbished Maraya. I'm looking forward to building a much more interesting site, with a lot of reference materials, and hopefully more workshops and more artwork. Fun, fun, fun. Frustrating, frustrating, frustrating.
Meantime, I did the last version of the Door (previous post) late last night, I was kind of groggy and forgot the steps. There weren't that many anyway, and most of them are uninteresting:

- I drained the colour, then did a tan-ish duotone, then went back to RGB.
- I also used the Cloud (or was it Difference Clouds) feature in the Render Filter in low opacity in Overlay (I think).
This sort of washed-out quality is not hard to achieve, and you can experiment until you find an effect you like.

Now for the interesting part: how did I put that light in the window? Easy peasy. I used the Lighting Effects option in Render - to illustrate, here's a quick example (disregard the esthetics, focus on the tutorial please)

Image 1: Plain

Image 2: Lighting effect applied in Flood Light Style, Spotlight Light type with a yellow hue

Image 3: Flashlight, Omni , white hue (I used something like this for the window light effect)

Try it with anything you have - lights on, lights off. On, off. On, off. On, off. Hehe.

9.8.07

Shhhh...


I'll try to explain the steps tomorrow - right now, I feel as sleepy as...

8.8.07

Open the Door

Red Door
For my first altered image, I took a page from Debi's book - for the last workshop, she had achieved such a delicate result by laying down almost transparent layers of the original image and fiddling with these layers. I thought I'd try it, and I just love what it helped me come up with.

First, I copied the original image, but cropped, to a new file, with low opacity. I also turned it to Grayscale so I could use the Duotone feature. For this first layer, I chose two hues of red.

Second, I created another layer, copied the image again in low opacity, but left it coloured. This is such a great trick, it really feels like you're laying a vellum on top of an image. I then repeated the process with a third layer, just like the first one, but with purple Duotone, to give more depth to the colours which were now rich and juicy.

Third, I used the Dry Brush in the Artistic Filters over and over, calibrating it slightly differently and using the Fade function in Edit every single time. I can't be more specific, because I couldn't keep track, I just fiddled with it until I liked the end result. I think I did the Dry Brush thing about 3 or 4 times.

Finally, I used the Smudge tool to erase the lettering on the store awning and the plaque on the door, and filled the pipe that was still showing on the right with the same colour as the wall.


Gravure

Just like Frances, I also felt that this image just called for some "antiquing" (love your title, Frances!). For this one, I used the Find Edges option in the Stylize tool in Filters, but edited it with the Fade option, and chose to go with Multiply instead of Normal with about 50 percent opacity. I repeated this step about 2 more times, and felt happy with the final, sketchy, inky look.

I've learned about GIMP a little bit this week - it's a free download and a lot of people swear by it. I think I'll save my next attempt for that new tool, as soon as I figure out how to download it.

Finally, as soon as my *%@!*&?!!@! laptop cooperates, you'll be able to see the new "wall" up at Maraya Galleries, as well as the completed Lily Wall (done but refusing to upload). Sometime before the end of this decade. Along with the new logo (not done yet) and the new features (still cooking). And more. Keeping my fingers and toes crossed. I'll just go rest my head now.

6.8.07

Time To Play Again! Digital Art Workshop Deux

C'mon! Time to get back inside! Disentangle yourself from that chaise-longue, toss that frozen margarita (or better yet, refresh it), kick off your Crocs and sit down to a new digital exercise.

You wanted more of a challenge, so here it is:

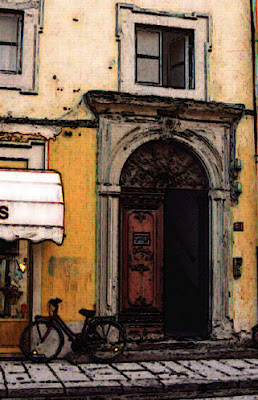
Pisa Door, by Ban Sidhe - courtesy www.wetcanvas.com

I found this copyright-friendly image on a terrific art site that hubby suddenly remembered to share with me, http://www.wetcanvas.com/. It's a fantastic resource for artists and wannabes like me, thanks in no small measure to its bottomless image library - by far the best source for public domain images I have found in my research.

To participate, all you have to do is copy the image to your computer - it's a fairly large file, so you may want to resize before saving it. Then go to town with your digital creativity (creative digitality?)
IF YOU'RE NOT ABLE TO GET THE LARGER IMAGE WHEN YOU CLICK ON THIS ONE, TRY THE ONE POSTED LATER BY ITSELF. IF NEITHER WORKS, PLEASE LET ME KNOW.
Now for some rules - I know it's a ridiculously optimistic request on my part since no one ever listens to me, but please remember to:
  • Modify the image in any way you like, with any digital art program you prefer. You can use the whole image or only parts of it for the final result - your choice.
  • Use at least 4 steps/effects, like artistic filters, layers, cropping, whatever – Opening and saving your files are NOT actual steps, and do not count as such, sorry. If you don't try at least 4 stages of modification, I will need a written note from your mom. I'm doing this for your own good. (You know that you can ask me for help on anything, so no excuses). Take your time, you have about two weeks.
  • Explain your process as well as you can - even if it's just to list your steps. We all want to learn from each other. Well, I do, and I did learn at least one new thing from each entry last time.
  • 3 submissions max, please and thank you! I know it's hard to stop once you start, but I'm old and slow now, and I get easily backlogged. I still haven't finished uploading the last few Irises to the website.
  • Send me a copy of your finished product, or allow me to copy it from your blog, so I can "hang" it on the Maraya Galleries website (no one can copy it from there). The artwork from last time looks so very lovely on my "wall" (http://www.marayagalleries.com/workshop/5.htm).

That's it. Now, ready, aim...

25.7.07

Wondrous Imagination, Wonderful Image-ing

Diane has gotten us used to her cornucopia of creativity - but I was still startled at the beauty that she infused these images with, part of our Lily Pad "series".
Look at the energy in these two:

Dancing with the Lilies

Square Dancing Lilies
How delightful and appealing is this one below?
Lily in the rain
Finally, this awesome and very cool tryptich:

Lily at dusk
Lily at first light

Nightlights Lily

Last but not least, Audrey's delightful contribution is on her blog with explanations (click to see the larger image to fully appreciate the fine detail)
They're not up on the website just yet, but they will very soon be taking their rightful place in that mini-pantheon of imagination and creativity.

So, thanks everyone - it's been a wonderful first experiment. I know you've enjoyed this as much as I have because you've said so - so sharpen those ...uh... mice? and get ready for the next one. Coming soon to a computer screen near you...