16.8.07

Grown-Up Meme Game

For Debi: Moi At the Apple Farm, Oct. 2006 -
That's the best I could do at short notice, we don't want to scare the little kiddies


So many topics to deal with, so little time... Consequently, I will, in typical Rima fashion, settle on an escapist break, a (sorta) grown-up version of this unoriginal but still-funny online meme game, where you get to answer prying questions with just one word. I promise to not psychoanalyse.

Here are my 23 questions. If you'd like to play along - and please don't let me feel ridiculous by leaving me to twist in the wind by myself - copy the list, and put in your own answers like I did below. It's slightly less cruel than, say, asking (no, daring!) you to post a portrait. Or, if you're really, really brave, you can combine both.

  1. What is your favorite object?

  2. Do you have music on right now?

  3. What is the state of your hair?

  4. What is your favorite drink?

  5. What do you fear most

  6. What is your favourite season?

  7. Who did you hang out with this weekend?

  8. What are you not good at?

  9. What is the weather like?

  10. What is your favourite cookie?

  11. Do you have a real wish list?

  12. What is your favourite thing in your house?

  13. How did you grow up?

  14. What aren’t you wearing?

  15. What is your kitchen specialty?

  16. Where is your ideal summer spent?

  17. What is your favorite colour?

  18. What do you love?

  19. What’s your favourite word?

  20. What’s missing?

  21. Where were you in 1993?

  22. What’s your favourite timepiece?

  23. What are you not?

My profound answers:
Do you have music on right now? No
What is the state of your hair? Desperate
What is your favorite object? Laptop
What is your favorite drink? Tea
What do you fear most? Time
What is your favourite season? Fall
Who did you hang out with this weekend? Friends
What are you not good at? Lying
What is the weather like? Hot
What is your favourite cookie? Sablé
Do you have a real wish list? No
What is your favourite thing in your house? Antiques
How did you grow up? Worried
What aren’t you wearing? Shoes
What is your kitchen specialty? Eating
Where is your ideal summer spent? Beachfront
What is your favorite colour? Turquoise
What do you love? Peace
What’s your favourite word? Serendipity
What’s missing? Peace
Where were you in 1993? Montreal
What’s your favourite timepiece? Absent
What are you not? Hypocritical

14.8.07

Venetian Charm, O'Kieffian Wit

Leaning Toward Venice - © S. O'Kieffe, 2007

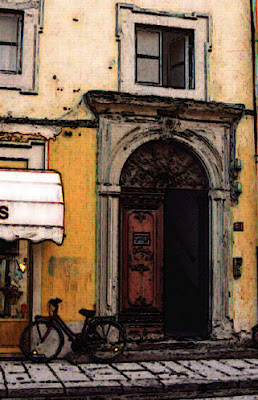
With her usual mastery, this is Sue's vision of the Door (remember, the original image is titled Pisa Door) - AND she sent steps along. Marvelous woman. Now read and learn. She even calls features by their correct names.

PART 1

  1. Duplicated image.

  2. Created a selection using rectangular marquee of right side of building.

  3. Copied and pasted it into new layer.

  4. Merged visible layers (Ctrl+shift+e)

  5. Moved selection to left side of new layer.

  6. Edit>Transform>Flip Horizontal to create symmetrical image.

  7. Set colors to default. Filters>Sketch>Photocopy.

  8. Set blending mode to multiply.

  9. Set blending mode of building to Hard Light. (This feature is possible in CS3)

  10. Created adjustment layer.

  11. At bottom of layer palette chose photo filter/cooling filter.

  12. I wanted to put image on a slant. Transformed image (Ctrl/Cmd+T). Edit>Transform>Skew

PART 2

  1. Chose photo of ocean water and adjusted size of image to correspond with image size of building

  2. Created symmetrical image of ocean as described above in step one

  3. Dragged image of ocean onto image of building

  4. Transformed image as described above to follow slant of building.

  5. Set blending mode to Lighten.

  6. I wanted it to look like water was running out from under the door and down the street, so I created a mask and set color to default.

  7. Using black I painted out all parts of the ocean I didn’t want visible. The nice thing about masking is you can undo anything you want by painting in white. BLACK CONCEALS AND WHITE REVEALS

PART 3

  1. Created reflection of building in water following steps in Part 1, step 1, except created a horizontal selection and flipped the image vertically

  2. Created a clipping mask over layer with water. Clipping masks only affect one specific layer at a time and are created in the layer palette by holding down the alt/option key while selecting the desired adjustment.

  3. I chose hue/saturation adjustment, and adjusted colors to hopefully reflect a more Mediterranean color.

  4. I still wasn’t happy with the results of how the water looked. First I chose a color in the color palette that was a turquoise green color and chose it for the foreground color.

  5. Then I went to Filters>Sketch>Photocopy, applied the filter and set blending mode to multiply. This is a handy technique I use in many of my mandalas, too, when I want to create a bit more depth in my images without it looking too much like an illustration.

PART 4

  1. Final adjustment. Created hue/saturation adjustment layer at top of layer stack. Set hue at -12/Saturation at +57

Sue has also very generously attached a copy of her layer colour palette and wrote this about it: "Things will look a bit different because of the specific features in CS3 I used that eliminates the use of multiple layers. It’s a great and long overdue feature, and as far as I can tell so far the best thing about the newest version of Photoshop."

Marvelous, marvelous woman.

(Check here for the "Wall", including Diane's modern/urban-dream take, and freshman Irene's very first attempt at digital imaging)

12.8.07

Doors of Opportunity

Pisa Door Prison D'or - © N.Doany
Thanks for this one, sister mine - especially since I know how tough it is for you to find the time to play.
"When God closes a door, somewhere He opens a window" - Maria von Trapp

Cat From Outer Space?

I seem to remember a movie like that from eons ago.

Anyhoo, here's Fawzan's first take on the Door (I don't know what to make of the writing on the window, but I know where he got the idea of the green light from...)

What are they doing to you? - F. Barrage

I'm starting to hang things on here. (For the previous workshop, check here.)

10.8.07

Frustration Update

No luck on the web editor front, still not able to upload anything. Plus my second printer is kaput.

I really wanted to provide a link to the completed Lily wall, and a good start on the Door one, but short of smashing my computer (a colleague used to call it a confuser) against the wall, I'm stumped. It's obviously going to take still longer to see a refurbished Maraya. I'm looking forward to building a much more interesting site, with a lot of reference materials, and hopefully more workshops and more artwork. Fun, fun, fun. Frustrating, frustrating, frustrating.
Meantime, I did the last version of the Door (previous post) late last night, I was kind of groggy and forgot the steps. There weren't that many anyway, and most of them are uninteresting:

- I drained the colour, then did a tan-ish duotone, then went back to RGB.
- I also used the Cloud (or was it Difference Clouds) feature in the Render Filter in low opacity in Overlay (I think).
This sort of washed-out quality is not hard to achieve, and you can experiment until you find an effect you like.

Now for the interesting part: how did I put that light in the window? Easy peasy. I used the Lighting Effects option in Render - to illustrate, here's a quick example (disregard the esthetics, focus on the tutorial please)

Image 1: Plain

Image 2: Lighting effect applied in Flood Light Style, Spotlight Light type with a yellow hue

Image 3: Flashlight, Omni , white hue (I used something like this for the window light effect)

Try it with anything you have - lights on, lights off. On, off. On, off. On, off. Hehe.

9.8.07

Shhhh...


I'll try to explain the steps tomorrow - right now, I feel as sleepy as...

8.8.07

Open the Door

Red Door
For my first altered image, I took a page from Debi's book - for the last workshop, she had achieved such a delicate result by laying down almost transparent layers of the original image and fiddling with these layers. I thought I'd try it, and I just love what it helped me come up with.

First, I copied the original image, but cropped, to a new file, with low opacity. I also turned it to Grayscale so I could use the Duotone feature. For this first layer, I chose two hues of red.

Second, I created another layer, copied the image again in low opacity, but left it coloured. This is such a great trick, it really feels like you're laying a vellum on top of an image. I then repeated the process with a third layer, just like the first one, but with purple Duotone, to give more depth to the colours which were now rich and juicy.

Third, I used the Dry Brush in the Artistic Filters over and over, calibrating it slightly differently and using the Fade function in Edit every single time. I can't be more specific, because I couldn't keep track, I just fiddled with it until I liked the end result. I think I did the Dry Brush thing about 3 or 4 times.

Finally, I used the Smudge tool to erase the lettering on the store awning and the plaque on the door, and filled the pipe that was still showing on the right with the same colour as the wall.


Gravure

Just like Frances, I also felt that this image just called for some "antiquing" (love your title, Frances!). For this one, I used the Find Edges option in the Stylize tool in Filters, but edited it with the Fade option, and chose to go with Multiply instead of Normal with about 50 percent opacity. I repeated this step about 2 more times, and felt happy with the final, sketchy, inky look.

I've learned about GIMP a little bit this week - it's a free download and a lot of people swear by it. I think I'll save my next attempt for that new tool, as soon as I figure out how to download it.

Finally, as soon as my *%@!*&?!!@! laptop cooperates, you'll be able to see the new "wall" up at Maraya Galleries, as well as the completed Lily Wall (done but refusing to upload). Sometime before the end of this decade. Along with the new logo (not done yet) and the new features (still cooking). And more. Keeping my fingers and toes crossed. I'll just go rest my head now.

6.8.07

Time To Play Again! Digital Art Workshop Deux

C'mon! Time to get back inside! Disentangle yourself from that chaise-longue, toss that frozen margarita (or better yet, refresh it), kick off your Crocs and sit down to a new digital exercise.

You wanted more of a challenge, so here it is:

Pisa Door, by Ban Sidhe - courtesy www.wetcanvas.com

I found this copyright-friendly image on a terrific art site that hubby suddenly remembered to share with me, http://www.wetcanvas.com/. It's a fantastic resource for artists and wannabes like me, thanks in no small measure to its bottomless image library - by far the best source for public domain images I have found in my research.

To participate, all you have to do is copy the image to your computer - it's a fairly large file, so you may want to resize before saving it. Then go to town with your digital creativity (creative digitality?)
IF YOU'RE NOT ABLE TO GET THE LARGER IMAGE WHEN YOU CLICK ON THIS ONE, TRY THE ONE POSTED LATER BY ITSELF. IF NEITHER WORKS, PLEASE LET ME KNOW.
Now for some rules - I know it's a ridiculously optimistic request on my part since no one ever listens to me, but please remember to:
  • Modify the image in any way you like, with any digital art program you prefer. You can use the whole image or only parts of it for the final result - your choice.
  • Use at least 4 steps/effects, like artistic filters, layers, cropping, whatever – Opening and saving your files are NOT actual steps, and do not count as such, sorry. If you don't try at least 4 stages of modification, I will need a written note from your mom. I'm doing this for your own good. (You know that you can ask me for help on anything, so no excuses). Take your time, you have about two weeks.
  • Explain your process as well as you can - even if it's just to list your steps. We all want to learn from each other. Well, I do, and I did learn at least one new thing from each entry last time.
  • 3 submissions max, please and thank you! I know it's hard to stop once you start, but I'm old and slow now, and I get easily backlogged. I still haven't finished uploading the last few Irises to the website.
  • Send me a copy of your finished product, or allow me to copy it from your blog, so I can "hang" it on the Maraya Galleries website (no one can copy it from there). The artwork from last time looks so very lovely on my "wall" (http://www.marayagalleries.com/workshop/5.htm).

That's it. Now, ready, aim...

Better Late?

Smile - ©R.Koleilat, 2007

I'm always trailing behind. I've always been the last one out the door, the last one to walk into the restaurant, the last one to hand in the assignment - and now I'm the last one to catch up with everyone else online.
I know this little mutual-admiration society of ours has already moved way past all the well-deserved pats on the back - especially the really prolific artists who seem to have a fire in their belly and, thankfully, cannot slow down the creative flow or the rapid-fire posts (you know who you are, Diane and Neda and Sue)... but I'm still here, distracted by summer days, hubby's vacation and toads in the creek (see Fawzan's lovely watercolour of yesterday's park visit here).
And now that I've finally gotten around to it, a round of applause for me too please as I proudly display the following award logos generously bestowed by Neda and Diane respectively (they like me, they really like me!)


Find out who created these awards, and why, here.